Pages

Sunday, August 5, 2012

My Dream House

This is my dream house. I think it's a fairly reasonable dream, one that's definitely achievable. This house is just barely over 2000 square feet (before I added a basement) so it's not a mansion by any means. It's cozy and compact and yet meets all my needs and wants. Add on an awesome detached garage for John, and a small barn in the back for me, and it's perfect.


You can click the picture to get a closer look.


Here is the original version of this floor plan.  You can see the changes I made - for the better in my opinion!


Also, this picture is the original artist's rendition of the exterior of the house, and (again) the changes I made to it. Mine is the blue one on the left.


*Sigh* Love, want, need, must someday have. WILL someday have!


Saturday, July 28, 2012

Dark Rye Bread

My first attempt at making dark rye bread...you know that yummy brown bread that they give you before your meal at Outback? Yeah...it's that kind of bread. YUM.

It took me forever to find rye flour...who'd have guessed I'd have to go to 3 different stores to find it? I ended up finding it at Whole Foods and it was quite expensive. I also heard afterwards that Bulk Barn carries it.  It's most likely cheaper at Bulk Barn, but judging by the name of the store, I wasn't sure if I'd be able to find a small package of it. I really don't need 50 lbs of rye flour.

The recipe!

Dark Rye Bread

Adapted from AllRecipes
Ingredients
1 (.25 ounce) package active dry yeast
3/4 cup warm water (110 degrees to 115 degrees)
1/4 cup molasses
3 tablespoons butter, softened
1 cup rye flour
2 tablespoons baking cocoa
1 tablespoon caraway seeds (I didn't use these)
1 teaspoon salt
1 3/4 cups all purpose flour – divided use
Oats – optional for decoration

Method
In the bowl of a stand mixer fitted with the paddle attachment, dissolve yeast in warm water. Add the molasses, butter, rye flour, cocoa powder, caraway seeds, salt and 1 cup of all purpose flour. Mix to combine. (I don't have a stand mixer anymore, so my tried and true method is bowl, wooden spoon, knead by hand. Works like a charm, and I've learned that I love, love, love kneading bread.)

Switch to the dough hook attachment and process/knead until the dough is smooth, elastic and climbs up the hook. Add remaining flour only as necessary to achieve the right consistency. You may not need the full amount of remaining flour – this is subjective. Turn the dough out onto a lightly floured surface and knead by hand for a few moments then collect dough into a ball.


Place dough ball in greased bowl, turning once to ensure the top is greased. Cover and let rise in a warm place until doubled in size – about 2 hours. (I found mine to be doubled in less than that - probably only and hour or so.)

Punch down dough, shape into a loaf about 10” long.
Place loaf onto a greased or Silpat lined baking sheet, cover and let rise until doubled in size – about an hour. ('Shaping' didn't work for me, so I rolled it out and then rolled it up.)

Pat on / press in optional oats. And bake at 350°F for 35-40 minutes or until bread sounds hallow when tapped. Remove from baking sheet and cool on wire rack. (The bread wasn't sticky enough to hold the oats on after it had risen for an hour. I used a little cooking spray and sprinkled the oats on, but they still didn't really stick. Next time, I'd roll the loaf in the oats before it rises, it was stickier at that stage.)

And that, as they say, is that. Fresh, delicious, dark & hearty, rye bread.


Monday, July 23, 2012

BLT (partly) from scratch

Today was the day that the first tomato was ripe enough to eat. So what did meal we choose to honour the first tomato of the season?

BLT's of course.  But not just any BLT, oh no. One made with fresh, delicious homemade french bread.

It unfortunately occurred to me AFTER I finished making the bread that I should have taken pictures and posted the recipe for my "Life from Scratch" blog...duh. Oh well, next time. For now, I'll just make you drool with pictures of the finished product...


ooooh...aaaaahhh...mmmmm...
The BLT's turned out absolutely delicious. The tomato was so sweet and juicy, the flavour actually overwhelmed the taste of the bacon, and THAT'S saying something. On another page, I have my list of goals, in which I talk about having a farm with animals and gardens. I believe I will have really achieved my goal when I can make a BLT 100% from scratch. Tomatoes and lettuce from my garden, bacon from my own pigs, mayonaise made from eggs from my chickens, and bread made with wheat from my fields. THAT is my goal. Our BLT's today weren't 100% homemade, but it's a step in the right direction and holy-moly they were good.

Tuesday, July 17, 2012

Changing garden

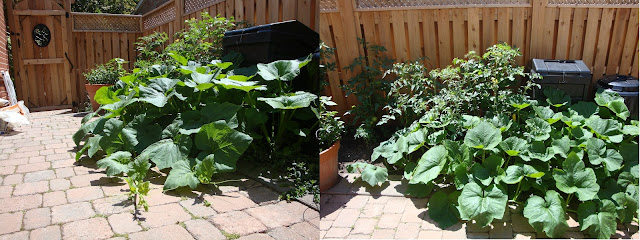
The garden is going bananas. (mmm, bananas.) The squash plants are about 2 days from declaring war on the house, and if that happens we're done for.

It's a jungle in there!
BUT - we have figured out what the mystery squash are! we've got butternut AND spaghetti squash!

Butternut                                                      Spaghetti
Also - drumroll please - we've got our first ripening tomato! In the coming weeks we're going to be inundated with more tomatoes than we can eat! I can't wait!


BLT's here we come!


The flowers in the garden are in full summer mode. The delicate flowers of spring have faded, and the hardier summer flowers are beginning to bloom.


Unfortunately, this year the squirrels got most of the apples before they were even ripe, but I've been watching this apple for weeks, and it's finally ripe! (or as close as we're going to let it get, before the squirrels decide to go after it.) We ate it yesterday and it was delicious!

Saturday, June 30, 2012

Garden pictures

I'm living with my parents for the time being, so I don't have much say in the things that get planted...regardless, I enjoy watching everything grow day by day, and the different blooms come and go. I'm so looking forward to the day that I have my own garden, and I can embark on my own adventures with planting. In the meantime, here are some pictures of what's currently growing in the O'Beirn family garden.
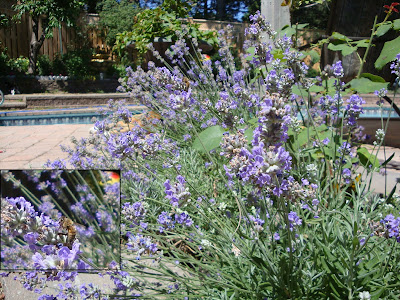
Honeybees love the lavender.
A lovely white rose growing on the trellis, and the one bloom on our hardy little bougainvillea.


Love our garden, we do.
The sound of water from the fountain is so soothing.

Delightful Delphiniums
The squash plants that took over the wooooorld! These were "volunteer" squash - there were only supposed to be tomatoes in the garden, but the squash seeds were living in the compost over the winter, and have decided to pop up and take over the garden. Mystery squash! We have no idea what kind they are! There are 4-5 plants here.


Giant pot of spearmint...left in the garden it takes over worse than the squash, so it all got pulled up and planted in this pot. Two weeks ago there were only 1-2 sprigs of mint, and now the pot is almost full. There's also a volunteer pepper plant, courtesy of the compost :)
Adorable little cherry tomatoes
A close-up shot of a squash blossom. They open wide in the morning, but close up in the afternoon when it gets hot
Large green tomatoes, just a little longer until they're ready to eat!


Wednesday, June 27, 2012

Vinegar cleaning solution - Day 1 update

Well, colour me shocked!

I was incredibly skeptical that soaking the orange peels for 1 night would have any effect on the vinegar, but it actually did! You could still smell the vinegar, but it was balanced with a citrus-y orange scent.

I cleaned a small section of the kitchen counter with it, and it did just as good as the all purpose chemical cleaner that we use.  The vinegar scent was a bit stronger when I spritzed it on the counter - although it did dissipate within a minute or two of cleaning. For someone who hates vinegar as much as I do, 1 night soaking probably won't be enough. However, for a quick(ish) solution, it definitely gets the job done.

I was actually quite surprised at the colour change. It's kind of hard to tell from this picture, but the colour change is quite a bit more drastic than my camera was able to pick up.

Last night                                                  Today           

Last night, the vinegar was basically clear. A few orange floaties, but no real colour to it. Today, it's the almost the same shade as Pine-Sol.

I'll keep checking it day by day until I figure out how long it needs to sit for optimal scent and cleaning power.

Tuesday, June 26, 2012

First attempt at vinegar cleaner

That is to say, a vinegar cleaning solution. I'm pretty sure the vinegar is already clean.

Anyhoo! As I mentioned in a previous post, I've been really inspired by my good friend over at Poor Man's Wife. She has blogged a few times about how much she loves cleaning with vinegar, and she recently posted her recipe for a citrus vinegar cleaning solution. (Is it a recipe if there are only two ingredients?) I love the idea of adding citrus to the vinegar...not only does it add a little extra cleaning power, it helps mask the scent of vinegar.  

I HATE THE SMELL OF VINEGAR. I mean, truly loathe with the fiery passion of a thousand suns.

------Background story time!  When I was 12 or so there was a lice (EWWWW) outbreak and my little sister and I ended up with it. So gross. My mom's solution to this was to wash our hair with lye, and then rinse it with vinegar. I wasn't crazy about vinegar to begin with, just never liked it much. So then it got dumped all over my lousy head and there were definitely some negative connotations associated with it.  Later that summer, we came up here to Canada to visit my dad. Unbeknownst to me, his girlfriend (later to become my amazing step-mum) kept vinegar in a water bottle in the fridge for making salads with. You can see where this is going. Crept downstairs in the middle of the night, dying of thirst, and saw a water bottle in the fridge. Gulped down about half of the bottle before my brain registered what I was drinking, and spent the next 20 minutes gagging in the sink and rinsing my mouth out. Vinegar is no longer kept in water bottles, by the way. So - two traumatizing vinegar stories from my youth, and you can probably see why I hate it so much. End background story.-------

I know that vinegar is an excellent cleaner. I've used it myself and had excellent results, but I just can't stomach that smell. However, I really want to switch to natural cleaners...so that means I either need to learn to deal with the scent, or mask it. Enter the citrus!

Poor Man's Wife says to soak your orange peels in vinegar overnight, and voila! Orange cleaning solution. I'm definitely willing to give it a try, but I'm a bit skeptical about how much vinegar smell can be covered up just overnight. So here's what I've done...


I've been saving my orange peels for a few days now (sticking them in a baggie in the freezer until I had enough for a batch). Turns out I actually had enough for two batches...but unfortunately didn't have two glass jars on hand. So, I used a clean, empty spice container. The lid isn't air tight so that's the batch I'm going to use first. I'm going to give it a whiff tomorrow and see how much of the vinegar scent has been masked, and then strain a bit out to see if I can stomach cleaning with it. I'm guessing my hatred of vinegar might be more than the average person, therefore 1 night probably isn't going to cut it. If it needs more time, I'll give it another go in about a week. The glass jar is going to sit for a month. I read another blog where the woman gave it a month and said that she couldn't smell the vinegar at all. I'm still skeptical, but again, willing to try.

Fingers crossed! I'll update tomorrow with the results of 1 night's soaking!